Modern day Okies leaving the dustbowl of corporate America.
Alex’s Playhouse: Flooring, Framing, and Sheathing
With the support posts up and the flooring joists installed, progress on the playhouse can continue. Next steps were to add flooring, framing, and sheathing. The flooring was easy since the the dimensions of the playhouse are 8′ x 12′ (3 sheets of plywood laid next to each other).
The framing was a more complex situation with the introduction of doors and windows. These had to be planned out and properly framed. We opted to build the east and west wall frames on the floor of the playhouse, sheath, and raise into place. This option was much safer than framing the wall in place and then trying to sheath it. Some safety concerns included the height we would be working off the ground and the hillside resulting in less than stable ladder placements. The south wall was the easiest to deal with since the deck could be used as a work space. The north wall was also easy to frame in place because it is only a few feet off the ground.
Place floor decking on joists and screw into place
Build walls – not in place but using the floor decking as a work space (framing and sheathing)
Raise walls and secure
Process (Gallery)
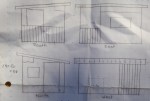
The original sketches for window and door placement on the playhouse. Got to love graph paper.
The key tool for this part of the project – the framing gun! Dave recently moved away from gas canister powered tools – they don’t work at altitude. This is the first real test for the DeWalt 20V framing gun.
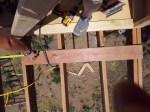
Framing nails. The purple section is glue that melts from the friction of the nail entering the wood. Help the nail stay in place – a good thing if you don’t have to correct any mistakes.
Measuring the center points for the studs.
One wall framed and sheathed.
Cutting off the extra sheathing. The sheathing is 3″ longer than the wall to allow it to overlap the floor joists. This will reduce the opportunity for water infiltration.
East wall is up! Window is framed and the sheathing will be cut out. Bracing is holding the wall in place.
The long view of the east wall. Note the overhang of the sheathing below the top of the floor joists.
The west wall is framed, sheathed, and installed.
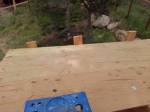
Installing the decking to increase the safe(ish) work area. Original idea was to use Trex, but leftover pressure treated lumber was used. A single board width gap was left to the sheathing could be installed with an overhang.
South wall is framed! This ties in the east and west walls. Bracing is redundant.
Long shot of three walls. North wall and roof will soon to be framed.
Nothing says safety like 4 points of contact for a ladder. The very temporary roof access.
Temporary vertical boards were added to the roof band board to keep the roof sheathing from sliding off.
The rafters are on center, but on the on center measurement didn’t line up with the edge of the plywood. Spacer board and 2×4 to the rescue.
Using a level to mark the rafter line to make for quick and easy screw down of the plywood.
This is obviously not an OSHA inspected work site. But Dave lives!
Cutting off the roof sheathing overhang.
Skill Level: Intermediate
Tip(s): Don’t put up pre-sheathed walls with a stiff wind blowing by yourself. Have a friend or two there to help.
Sizing the playhouse to be 3 sheets of plywood made it simple to install the floor decking – no need to cut plywood down