Distance/Elevation/Difficulty: 4.3 miles (total)/~180 feet/Easy
Time Elapsed: 180 minutes.
Comments: This was a beautiful hike that was even more enjoyable since we were hiking with friends. Based on their advice, we arrived at 9 am in the Brainard Lake parking lot. The Long Lake lot was already full and the ranger said a 6 – 6:30 am arrival was needed to ensure a spot in the Long Lake lot! This is not happening with Alex. Starting at the Brainard Lake lot added 1.5 miles round trip to our 2.8 mile hike, so be prepared to for a longer walk. The Long Lake Loop is also known as the Jean Lunning Loop.
Alex did great and hiked approximately 3.5 miles (out to the trail, the trail, and was carried from the trail head to the parking lot). In general, the trail is smooth and wide. There are some wooden bridges above swampy sections, but they are very sturdy. Leashed dogs are welcome and all pups we encountered were very well behaved. Alex dipped his toes in the lake and confirmed it was cold. Despite the chilly, he had a great time wading in the lake.
Would we return? Definitely. The road up to the recreation area is good and there is a campground. We hope to bring Abby up soon for a long weekend so we can get an early start and go on longer day hikes. Another option we look forward to is taking a picnic to Brainard Lake – no hiking, just Alex splashing in the water.
Gallery
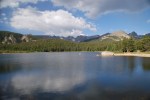
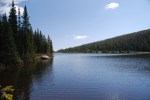
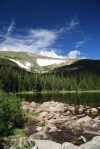
Outflow of Brainard Lake.
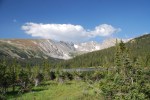
View of Long Lake and Niwot Ridge.
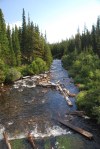
South St. Vrain Creek with Apache Peak (13,441 ft) and Shoshoni Peak (12,967 ft).
Destination: Rainbow Lakes, Roosevelt National Forest
Date: 8/13/2017
Time of Day: 9:45 am start
Distance/Elevation/Difficulty: 2.6 miles (total)/~396 feet/Easy
Time Elapsed: 180 minutes.
Comments: This is the second time we hiked (or tried to hike this trail). Our first hike was almost two months ago, the first weekend that the trails and campground was open. It was a madhouse. This weekend was much quieter: we were able to get a parking spot in the trail head lot, campground was not full, and there were fewer people dispersed camping along the road to the trail head.
We were actually hiking at 9:45. Out of the house by 9:15 and the road was much improved compared to two months ago. It seems like gravel was brought in and a road grader touch the surface to help reduce the bone rattling drive. We would actually think about bringing Abby up the road (if poor Abby was in running condition).
As with our first trip, the trail is still poorly marked and the multitude of social trails just add to the challenge. Following the trail was easier this time with the snow fields melted away and down trees cleared. We clearly saw where we lost the trail on our first hike and where the trail went. It is no wonder we lost it, two months ago it was covered with snow. With the snow gone it was little more than a goat path through some rocks.
As the trail heads down to the second lake, there is an option to take the second switch back and go to the lake shore, or continue on straight towards the third and fourth lakes. The distance between lake 1 and 2 is very close, it is a longer hike from lake 2 to 3, and lakes 3 and 4 are adjacent. There is a fifth lake close to lake 4, but we did not pick out the trail to head that way.
While we were dipping our toes in the frigid water of lake 2, fellow hikers shared the report of a moose sighting in lake 4. Alex, who desperately wants to see a moose, led the way. Unfortunately, we arrived at the lake after Mr. Moose had gone home to take a nap. According to Alex, Mr. Moose is a fan of Thomas the Train and was going to watch Thomas after his nap.
Alex was in a hiking mood and hiked the entire trail out and back. A great little trooper. This took us 3 hours to do the full loop (and we foolishly though we walked close to 2.6 miles the first time. Ha!). Considering the size of rocks Alex had to clamber over and that we stopped to dip our toes in a frigid lake, 3 hours was a good pace.
Ah, college kids: About 1/10 of a mile shy of the trail head, we saw a group of college kids heading up to the lakes to fish. One kid carrying a half dozen poles, another kid with a bucket, a couple kids carrying food/camp chairs, and the two poor souls at the end lugging up a cooler. Filled with ice (and beers?)? These poor souls thought the lake (and only one lake) was much closer to the parking lot than the 3/4 of a mile they had in front of them.
Other observations: Mushroom hunters! We saw several people carrying buckets and looking for mushrooms. When asked, one person said that it wasn’t the most successful forage she has ever done.
Would we return? Definitely. It was so much easier the second time around without the snow on the ground. It would be nice to find the fifth lake and perhaps see the moose. One should note, that these are small ‘lakes’ (ponds really). So if expectations are along the size of the Great Lakes, disappointment will abound.
Gallery
Map of Indian Peaks Wilderness at the Rainbow Lakes/Arapaho Glacier trail head.
Moon over the mountains at lake 1.
Dipping our feet in the very cold water of lake 2.
Alex wanted to dip his toes in further.
Rock field.
Lake 4.
A very hardy flowering bush growing from between the rocks.
The deck is heading towards the home stretch! Part 2 of the deck reassembly covers many of the repairs (and then some) that the upper deck needed. New band board was put in along with joist hangers (that were nailed appropriately).
What was truly revolutionary were the StairLok stair brackets (purchased from Deck Superstore). Trex does not recommend an unsupported span greater than 16 inches for their product, which is an awful narrow stair. Our stair widths were 36 (lower to upper deck) and 40 inches (ground to lower deck). After some research, we opted for StairLok because they are easier to build, stronger, and use less material than traditional stair building methods. The gallery describes the process for building the stairs.
Preparation:Remove decking, watch rotten post fall away when railing is removed (see Demo post part 3)
Decking – Healthy amount of patience, well developed curse word vocabulary, screw gun, clamps, jig saw, circular saw, railing jig, level, nail gun, level, tap measure
Skill Level: Advanced/Expert. If you don’t know what you are doing, things will get ugly.
Tip(s): Check the step frame with a carpenters square. The brackets have a tendency to rack. Confirming that the stairs are square saves a ton of headache during the install.
Use a stop block when numerous pieces that same size need to be cut. Check to make sure the block hasn’t slid at regular intervals in the cutting process.
Set up an assembly line: pre-cut all the stair frames and cross bracing. Then start building. Nothing slows a process down like having to constantly switch tools.
Gallery
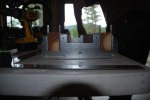
2x4s in Stair lock bracket. 2x4s were cut 3 inches narrower than stair width to account for stair horses.
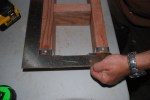
Using screws to fasten the sides of the StairLok bracket to the 2x4s.
Metal tabs bent over and screwed into the bottom of the 2×4.
Using a nail gun to secure the cross braces/nailers between the 2x4s.
Using a carpenter’s square to verify that the stair is square and hasn’t racked.
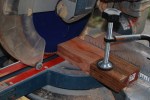
Using a wood block clamped to the to chop saw as a stop block for quick cutting of the cross braces.
Trex boards overhang 1.5 inches. This overhang will rest on the stair horse.
Securing the Trex board to the StairLok system.
Use of a Trex system hidden fastener as a spacer for the stair treads.