These draperies were custom made by Best Fabric Store, a fantastic operation out of Alabama. We have been using them as a fabric source for a few years now. They also do custom sewing, and with splitting the time between the two houses, working, and commuting, this potential DIY project was contracted out.
We also selected blackout fabric as the lining. The sun can beat through the southern windows and to reduce solar gain (in the summer) and insulate against the chilly night air (winter) a heavier blackout fabric was selected.
A huge thanks to the Best Fabric Store team. We are thrilled with the quality of the workmanship. And a pat on our own backs for our hidden interior design skills (fabric and living room wall color play off of each other very well).
Fabric: Rockin’ Robin with blackout fabric
Color: Driftwood (Coral selected for master bedroom and not shown)
Size: 2 panels providing 1.85X coverage of an opening ~81 inches wide. Each panel was ~83 inches long
It is another demo and rebuild post! There seems to be a lot of demo and rebuilding posts (laundry room, master bath), but no posts showing the finished product. That would be a correct assessment. The answer is simple; because no room is completely done yet. The laundry room and master bath have been pushed to a point of functionality, but we still have a FinishingList. Why not finishing the finishing details? Well, we have a move in date in approximately 3 weeks. We want to get the really messy stuff done when we aren’t living there full time. The fine points can be done after we move in, if necessary.
That being said, what is being torn apart this time? The master bedroom closet and a coat closet on the other side of the wall (weirdest location, no where near a door that could be considered a main entrance of the house). The door to the coat closet will be walled in and the wall between the closets will be taken down. The opening of the closet in the master bedroom will be expanded. What can go wrong? Fun surprises like plumbing or vent pipes in the wall to be torn down. We can only wait and see.
No big surprises! A run of coaxial cable and nothing that would otherwise derail this project was found. Dave proceeded to close up the one opening and proceed with his favorite remodeling task – drywall work. Too bad Alex didn’t get to enjoy the giant running loop created by the removal of the wall.
So the question is, what are we going to do with the unpainted space? Built in cabinets. That is for another post though.
Preparation: Remove trim
Critical Tools: Sawzall, hammer, pry bar, beer
Skill Level: Medium – to reduce drywall repairs to the closet opening, you have to be careful with what you take down.
Tip(s): Measure carefully and be judicious in what you take down. If too much is taken down, more work will be created when you have to put it all back up.
Living in a drywall work environment is unpleasant. Sand when the least amount of people are around.
Gallery
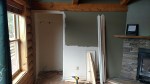
The coat closet in the living room. It will soon serve a greater function.
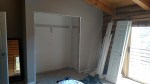
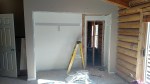
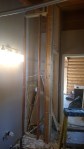
The master bedroom closet. The drywall to the right of the opening will be removed to create the larger closet.
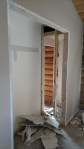
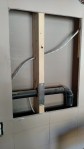
Drywall removed from the wall between closets. Looks pretty clean.
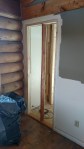
View of closet door from the living room.
Beginning to frame in the coat closet door.
The wall between closets is gone. No surprises!
And adios closet!
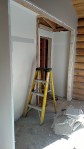
Newly enlarged master closet door. New drywall is where the coat closet door used to be located.
What comes apart must go back together! After the fun of demo, the master bath needed to be reassembled. We have been enjoying sharing the hall bath with Alex, but it would be nice to have our own bathroom back.
So, what was involved in the reassembly? First, some unplanned work. In the demo post, the recessed medicine cabinet plan was thwarted by the sink vent pipe and forcing the cabinets to become surface mounted. Like a butterfly flapping its wings and causing a hurricane on the other side of the world, the vent pipe location increased the work load. First, the recessed cut out had to be repaired. Then, a box had to be built as a mount for the lights above the medicine cabinet. Why build this box? Without the box, the lights would be shining directly over the medicine cabinet. The box provides the proper clearance for the lights. This would not have been necessary if the cabinets could have been recessed like originally planned.
Second, in addition to drywall repair, was the hanging of new drywall over the newly framed closet and elevated storage area. All the seams needed to be mudded, taped, and mudded. The walls were sanded smooth and were ready for primer and paint.
The toilet was the third stage of the master bath reassembly. A new wax ring and toilet flange extension. The old wax ring is best if used once. A new one cost $6, which is a small price to pay to prevent sewage leaking. The toilet flange extension was required because we increased the depth of the floor. Don’t forget to purchase new bolts as well. Otherwise you might just have to go out to the store. Again.
And finally, the vanity. The vanity is a beast – it was very interesting to carry it up to the main floor from the garage. The quality of the construction was evident when the holes were drilled for the water and sewer lines – no MDF here, but real plywood.
Skill Level: Expert. Why? Drywall. Custom wooden box build. Wiring work (switching out light fixtures). Plumbing work. Drilling a vanity cabinet for plumbing work. Don’t attempt if you can’t put together IKEA furniture. Even if you have, find a friend with construction experience.
Critical tools: All of them. And the kitchen sink for good measure. Select tools: Drywall (spackling knives, drywall saw, screw gun, nail gun); plumbing (PEX crimpers, hole saw, saw to cut pipe); electrical (wire cutters, wire strippers)
Tips: Add your sink hardware before setting the vanity top on base.
Paint before setting toilet and vanity. Reduces cut in work, saves time.
Try and coordinate drywall for all projects and hire it out to the pros.
With the major work in the laundry room completed and those nagging fine details left, we have begun to focus our efforts on the master bath. So what are we doing to this move in ready bathroom? New flooring, paint, single vanity is being replaced with a double. This means the existing linen closet is going to be replaced with a smaller one. Smart moves for a house that is already short on storage. We hope to recoup some of our lost linen closet storage space with some overhead cubbies.
What the master bath looked like before we decided to overhaul it.
First step of the process – demolition! First sub-step of demolition – remove the toilet and vanity. The vanity was not installed correctly, so removing it was a simple as dragging it out of the bathroom (once the plumbing connections were disconnected). The vanity will be given a new top a re-used in the hall bath. Until that day, it shall live in the garage. Next sub-step of demolition was the removal of the shelves from the linen closet followed by the drywall. Stripping off the drywall was the moment of truth – and we were lucky. No nasty surprised like a pipe in the wall we wanted to remove. The project can proceed unhindered! The framing was removed and was in such good shape it could be reused.
The floor tiles, vinyl, but not peel and stick, were well adhered to subfloor with mastic. With the exception of a few tiles in the closet that were pulling up, the tiles were not removed. 3/8″ plywood was screwed down on top of the tile to provide a clean surface for the thin-set to adhere to. Check out our first laundry room post for flooring details.
Final part of the demo process was creating the cut-outs for the recessed medicine cabinets. Our first surprise arrived in the form of a vent pipe where the cabinet was supposed to be recessed. Since the cabinets are recess or surface mount, plans were changed and the medicine cabinets will now be mounted on the wall surface.
Tip(s): Have more trash bags than you think you are going to need. When in doubt, buy the big box of heavy duty contractor bags. Drywall weighs a lot.
Don’t use your tools of destruction recklessly. Recover and reuse what you can.
Drain the water from the toilet. Wear rubber gloves and have an old towel that you can throw away. You need that towel to stuff in the sewer pipe (the hole in the floor).
Turn off your water valves.
Gallery
Toilet removed, sewer pipe stuffed with towel.
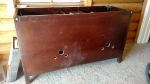
Vanity removed as well. Black box is vent diverter.
Closet with shelves removed.
Drywall removed. The kind souls who worked on the house previously left extra wire in the wall. Not to code, but helpful.
Salvaged 2 x 4 boards.
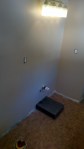
The vent pipe that forced the medicine cabinets to become surface mounted. And more mudding and taping of drywall.
Alex helping Dave by crawling through a Ditra tunnel.
Next stage of the laundry room remodel is paint and cabinets! Paint is always a challenge. The laundry room original color scheme was mauve and tan, which simply had to go. We decided on a color scheme that had grey undertones, so that at least narrowed down our options from thousands to hundreds.
We settled on Balboa Mist (Benjamin Moore #1549) . A grey with blue/lavender undertones. Light in color because the laundry room is on the north side of the house and does not get a lot of natural light. In hindsight, we could have selected something with a little more color in it, but it works for now and we shall see if we are still liking it the next time our preferred paint comes on sale.
Preparation: Removed the single shelf from the wall and patched holes and the drywall bulge. Use fibrous tape when patching. Much better results and the homeowners that follow you won’t curse your repair nearly as vehemently.
Paint: Benjamin Moore Regal Select Matte Balboa Mist #1549. We have had a great experience with Benjamin Moore Regal Select paint. It is a thicker paint and provides excellent coverage. Durable as well.
Cabinets: All were Arcadia Diamond NOW cabinets available at Lowe’s. One sink cabinet, one 30″ wide base, one 30″W X 18″H wall, and one 36″W X 30″H (wanted 18″H, but that was ‘unavailable’ even to order).
Counter top: Laminate counter top purchased from Lowe’s. Since the picture is rather small on the website and doesn’t really get bigger with zooming, we took a it of a chance. Besides, it was sold in a 6 foot length and we needed just under 6 feet. Turned out fine. Nice combination of browns and golds.
Skill Level: Cabinets – intermediate; counter tops – expert. The counter tops would have been intermediate except for the log wall. That required a specialty cut utilizing a jig saw, planer, and palm sander. Fine details but the difference between wondering if the job was done by a professional or knowing it was done by the local yokel after a few beers. Check out this YouTube video for cutting laminate counter tops.
Tip(s): Buy a good laser level. It makes setting the cabinets so much easier.
Shark bites (or whatever brand you prefer). Spend the money. Hate plumbing work slightly less.
Spend the 40 or so dollars and buy the classic and affinity color fans (or the color fans for whatever line of paint you choose). We used to grab one or two of the color sample strips, take them home, decide we really didn’t like any of the colors, and go back to the store for more options. Having the color fans was SO. MUCH. EASIER.
When you show up at the paint store at 7 am, they assume you are a contractor and have an account.
Easiest way to keep an active toddler from helping? One parent takes the kiddo 2000 or so miles away to visit grandparents. This equates to almost a week of uninterrupted work.
Gallery
Plumbing modifications. Added valves for the sink and created an access point for the drain. Used existing washer plumbing.
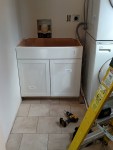
Sink base cabinet in place.
New electrical outlet at counter top level. Hole had to be cut in the back of the base cabinet for a junction box where the lower outlet was.
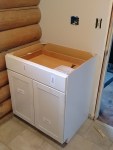
Base cabinet by door. Original plans called for it on window (log) wall. Application of logic indicated door swinging into entry doorway was not the best plan.
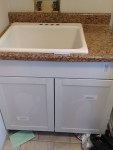
Utility sink and counter top installed.
Base cabinet with counter top by door. Original plans called for it on window (log) wall. Application of logic indicated door swinging into entry doorway was not the best plan.
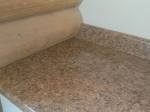
Spacing blocks required to raise the counter top to prevent interference with the drawer.
Exterior side view of the counter top. The counter top lip would have interfered with the cabinet drawer without the spacing blocks.
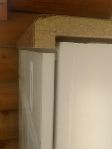
Close up of counter top meeting log wall. Required jigsaw, planer, and palm sander. A lot of work to make it look that pretty.
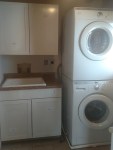
Utility sink with wall cabinet. Gap between the cabinet and washer/dryer stack is just big enough to slip a small step ladder – great for accessing the upper shelves.
Upper wall cabinet installed.
New outlets and light switch.
High shelving. We decided against cabinets to keep our costs down.
Hoses and wires neatly run. Washer connection box, once a dingy beige, freshly spray painted white. Devil’s in the details.