Master Bath: Final Product

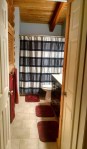
And after an eternity between the master bath demo and reassembly posts, pictures of a finished product! Well, let’s call it mostly finished. Curtains would help soften the log wall, but that will be a separate post when decisions are finally made.

The master bath has been functional for a month or two now; but we finally got the vast majority of the dry wall dust cleaned off the log walls, new towels (after determining we had our previous towels for over six years) and shower curtain purchased, and the closet door knob installed.

This is not a large bathroom, but it works well for us.

So glad for

  1. The double vanity. It is really nice having two separate sinks so we don’t have to stagger our night time routines.
  2. The medicine cabinets. Why houses built in the early 90s favored larger mirrors over medicine cabinets is beyond us. So happy to have a space to store our toiletries.
  3. The door to the bathroom. Our rental in Loveland had a master bath that was open to the bedroom; exception being the poopatorium. Ridiculous set up, especially if you have one person rising early for work.
  4. The upper storage. This utilizes the void space above the closet and dramatically increases the storage capabilities of the house. We already have our suitcases, Christmas decorations, and a couple of other miscellaneous storage boxes tucked up in this nook.

What we miss

  1. The separate poopatorium. It was nice having the toilet sequestered off so the rest of the bathroom could be used in tandem.

What the (far) future holds

  1. The current tile in the tube is a standard subway tile. Completely functional, just a little boring. Someday, this will be replaced.

Gallery

Master Bath: Demolition

With the major work in the laundry room completed and those nagging fine details left, we have begun to focus our efforts on the master bath. So what are we doing to this move in ready bathroom? New flooring, paint, single vanity is being replaced with a double. This means the existing linen closet is going to be replaced with a smaller one. Smart moves for a house that is already short on storage. We hope to recoup some of our lost linen closet storage space with some overhead cubbies.

What the master bath looked like before we decided to overhaul it.

First step of the process – demolition! First sub-step of demolition – remove the toilet and vanity. The vanity was not installed correctly, so removing it was a simple as dragging it out of the bathroom (once the plumbing connections were disconnected). The vanity will be given a new top a re-used in the hall bath. Until that day, it shall live in the garage. Next sub-step of demolition was the removal of the shelves from the linen closet followed by the drywall. Stripping off the drywall was the moment of truth – and we were lucky. No nasty surprised like a pipe in the wall we wanted to remove. The project can proceed unhindered! The framing was removed and was in such good shape it could be reused.

The floor tiles, vinyl, but not peel and stick, were well adhered to subfloor with mastic. With the exception of a few tiles in the closet that were pulling up, the tiles were not removed. 3/8″ plywood was screwed down on top of the tile to provide a clean surface for the thin-set to adhere to. Check out our first laundry room post for flooring details.

Final part of the demo process was creating the cut-outs for the recessed medicine cabinets. Our first surprise arrived in the form of a vent pipe where the cabinet was supposed to be recessed. Since the cabinets are recess or surface mount, plans were changed and the medicine cabinets will now be mounted on the wall surface.

Preparation: Remove light fixtures, toilet, vanity

Critical Tools: Sawzall, hammer, scraper, wrenches, strong back, beer

Skill Level: Easy

Tip(s): Have more trash bags than you think you are going to need. When in doubt, buy the big box of heavy duty contractor bags. Drywall weighs a lot.

Don’t use your tools of destruction recklessly. Recover and reuse what you can.

Drain the water from the toilet. Wear rubber gloves and have an old towel that you can throw away. You need that towel to stuff in the sewer pipe (the hole in the floor).

Turn off your water valves.

Gallery