Alex’s playhouse has been done for almost a year now, and this post is finally going to see the light of day.
Doors, windows (plexiglass), and soffets were added. An area rug was purchased as a floor covering to keep splinters out of little feet were purchased. A toy kitchen was also added. Alex did express disappointment that it didn’t have running water or power. He didn’t appreciate Dave telling him it is powered by imagination. We also added a swing.
With the support posts up and the flooring joists installed, progress on the playhouse can continue. Next steps were to add flooring, framing, and sheathing. The flooring was easy since the the dimensions of the playhouse are 8′ x 12′ (3 sheets of plywood laid next to each other).
The framing was a more complex situation with the introduction of doors and windows. These had to be planned out and properly framed. We opted to build the east and west wall frames on the floor of the playhouse, sheath, and raise into place. This option was much safer than framing the wall in place and then trying to sheath it. Some safety concerns included the height we would be working off the ground and the hillside resulting in less than stable ladder placements. The south wall was the easiest to deal with since the deck could be used as a work space. The north wall was also easy to frame in place because it is only a few feet off the ground.
Place floor decking on joists and screw into place
Build walls – not in place but using the floor decking as a work space (framing and sheathing)
Raise walls and secure
Process (Gallery)
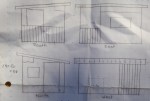
The original sketches for window and door placement on the playhouse. Got to love graph paper.
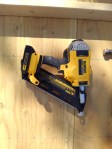
The key tool for this part of the project – the framing gun! Dave recently moved away from gas canister powered tools – they don’t work at altitude. This is the first real test for the DeWalt 20V framing gun.
Framing nails. The purple section is glue that melts from the friction of the nail entering the wood. Help the nail stay in place – a good thing if you don’t have to correct any mistakes.
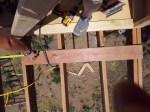
Measuring the center points for the studs.
One wall framed and sheathed.
Cutting off the extra sheathing. The sheathing is 3″ longer than the wall to allow it to overlap the floor joists. This will reduce the opportunity for water infiltration.
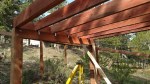
East wall is up! Window is framed and the sheathing will be cut out. Bracing is holding the wall in place.
The long view of the east wall. Note the overhang of the sheathing below the top of the floor joists.
The west wall is framed, sheathed, and installed.
Installing the decking to increase the safe(ish) work area. Original idea was to use Trex, but leftover pressure treated lumber was used. A single board width gap was left to the sheathing could be installed with an overhang.
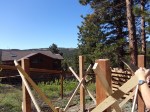
South wall is framed! This ties in the east and west walls. Bracing is redundant.
Long shot of three walls. North wall and roof will soon to be framed.
Nothing says safety like 4 points of contact for a ladder. The very temporary roof access.
Temporary vertical boards were added to the roof band board to keep the roof sheathing from sliding off.
The rafters are on center, but on the on center measurement didn’t line up with the edge of the plywood. Spacer board and 2×4 to the rescue.
Using a level to mark the rafter line to make for quick and easy screw down of the plywood.
This is obviously not an OSHA inspected work site. But Dave lives!
Cutting off the roof sheathing overhang.
Skill Level: Intermediate
Tip(s): Don’t put up pre-sheathed walls with a stiff wind blowing by yourself. Have a friend or two there to help.
Sizing the playhouse to be 3 sheets of plywood made it simple to install the floor decking – no need to cut plywood down
Alex’s birthday has come and gone and unfortunately the playhouse wasn’t finished in time. We experienced a delay with having to move the playhouse location in order to maintain good relations with our neighbors. Lesson learned, go into more detail on what one is seeking approval. All is good, friendly relations were preserved. In part thanks to the use of the demo hammer – quick work was made of hole digging and original footer destruction. Everything else transferred over (brackets were salvaged!), the posts just had to be cut down to accommodate the different elevation.
Critical Tools: Levels – old school and laser, circular saw, reciprocating saw, measuring tape, drill with spade bit, guide string
Process (Simplified):
Create channel is post, drill through bolt holes, mount post.
Determine desired floor height and use laser level to determine cut down post height of a single post (cut down post height = top of post – floor decking – floor joist)
Cut posts down to proper height and notch out shoulder for support beams.
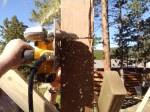
Using the circular saw to groove the support post to fit the brackets.
Completed grooves – makes the router work easier!
Using the the router to remove the majority of the wood.
Use a chisel to create an even surface
Make sure the post is straight!
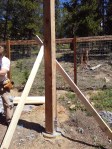
Bracing the support post to keep it level.
Mounting of the laser level.
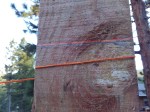
The laser line marked with pencil (use a carpenters square to ensure a straight line and to mark all sides of the post).
Circular saw is used to cut on all 4 sides. Sawzall was used to finish cutting through the post.
4 cut posts.
Cutting out the notch to create the shoulder for the floor joist support beams.
Support beams for the floor joists. Double 2 x 10s bolted in the front, shouldered on the vertical post. Double 2 x 8s in the back, bolted through, shouldered. Larger beam in the front to help support the cantilever.
2 x 8 floor joists installed with hurricane hangers.
Skill Level: Advanced/Expert.
Tip(s): Use the laser level to mark the posts at dusk. Makes it much easier to see the line.
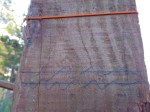
Know your tools. We mounted the laser level to make the top of all posts (floor height). While we struggled with the optical illusion introduced by the land’s slope, something still didn’t look right. We fastened a 2 x 4 along the marks across two posts and checked with an old fashioned level. Definitely out of level. Looking closer at the laser level it was determined the wrong setting was being used. Whoops. Second tip is when in doubt using a different method to confirm what you are seeing.
The on but ‘locked’ position “fixes” the level and permits you to draw a diagonal line. Not the proper setting choice for our application. The ‘unlocked’ position allows the laser to free float, so a line at the same level can be determined.
The multiple errors in not having the laser level on the proper setting.
With Alex’s birthday fast approaching, we thought it was time he had a playhouse to enjoy. Our initial plan was to purchase a playhouse from Costco or Amazon (something like this, not this – read the reviews), but discovered the smallest ones needed a flat area approximately 154 square feet for the structure and 598 square feet for a safe play area. Our sloped mountain lot does not have this type of level area, at least not without a major earth moving project.
Plan B? Build a playhouse from scratch! Since we can’t find something that suits our lot, we are going to build. And our next house project is with the various engineers, we need something to keep us busy.
As always with our construction posts, when associated with actual building, ‘we’ is Dave.
Preparation:Select build site, with consideration for set backs. Know your local regulations on how large of a structure you can build without a permit.
Critical Tools: Makita 20 lb Demolition Hammer – This tool was rented from Home Depot and was selected because it also has drill functionality. Just in case rocks are encountered in the Rocky Mountains.
Trigonometry and guide string – To ensure square corners just remember a^2 + b^2 = c^2. Yes, that seemingly useless class will come back to haunt you.
Process (Simplified):
Dig first hole and set concrete form
Mix and pour concrete, set support brackets
Confirm location of next hole
Repeat
Skill Level: Advanced/Expert. There is trigonometry involved.
Tip(s): Just rent the demolition hammer. A post hole digger and breaker bar will only get you so far.
Gallery
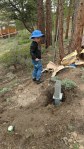
Hey, look! A rock! Probing with the breaker bar indicated it is a rather large rock.
Time to see what the demolition hammer can do.
Like a hot knife through butter. 4 holes made in no time at all.
Bolts held in place by epoxy. Center bolt is for the post bracket. The other 3 bolts are to provide anchoring points into the concrete.
Need to mix concrete? Got a kiddie pool?
Bracket in place for final positioning. Hole filled 2/3 with concrete, threaded bolt to increase anchoring for bracket. After final positioning, form placed in hole and filled up with concrete.
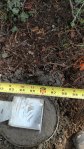
Finished bracket Measuring for the placement of the next hole.
Measuring.
Measure many times, dig a hole once.
Using the Pythagorean Theorem to confirm hole placement.