With winter somewhat behind us, we started our garage project. Summer seemed like it was in full swing when we began our dig, but a cold snap showed up a few days later. We kept on chugging through – summer is short in the mountains. (For the big picture of this renovation click here)
The first couple of days of excavation were promising. There was more top soil than we expected. Fingers were crossed that this would keep up. We had local sources who wanted the fill coming out of our job site (saving lots of money not trucking the fill down the canyon). Over the next few days we hit rock. Nothing the backhoe couldn’t handle, but the going slowed down. Then we hit the hard rock. Our excavator had to bring in his rock breaker, things really slowed down, and costs went up. But the hole got dug.
Check out the time-lapse videos below for some digging fun. We didn’t get every day, but you get the idea.
Initial Estimate (time, fill to be removed): 4 days, 250 cubic yards of fill
Final Estimate (time, fill removed): 11 days, 450 cubic yards/658 tons of fill
Day 1 – started capturing images a little bit late, but we are off to the races on this project.
Day 2 – more digging.
Day 3 – Dirt continues to be removed.
Day 4ish? Yes, that is snow . . . at the end of May. We might post the video of the summer solstice snow we received . . .
With Alex’s birthday fast approaching, we thought it was time he had a playhouse to enjoy. Our initial plan was to purchase a playhouse from Costco or Amazon (something like this, not this – read the reviews), but discovered the smallest ones needed a flat area approximately 154 square feet for the structure and 598 square feet for a safe play area. Our sloped mountain lot does not have this type of level area, at least not without a major earth moving project.
Plan B? Build a playhouse from scratch! Since we can’t find something that suits our lot, we are going to build. And our next house project is with the various engineers, we need something to keep us busy.
As always with our construction posts, when associated with actual building, ‘we’ is Dave.
Preparation:Select build site, with consideration for set backs. Know your local regulations on how large of a structure you can build without a permit.
Critical Tools: Makita 20 lb Demolition Hammer – This tool was rented from Home Depot and was selected because it also has drill functionality. Just in case rocks are encountered in the Rocky Mountains.
Trigonometry and guide string – To ensure square corners just remember a^2 + b^2 = c^2. Yes, that seemingly useless class will come back to haunt you.
Process (Simplified):
Dig first hole and set concrete form
Mix and pour concrete, set support brackets
Confirm location of next hole
Repeat
Skill Level: Advanced/Expert. There is trigonometry involved.
Tip(s): Just rent the demolition hammer. A post hole digger and breaker bar will only get you so far.
Gallery
Hey, look! A rock! Probing with the breaker bar indicated it is a rather large rock.
Time to see what the demolition hammer can do.
Like a hot knife through butter. 4 holes made in no time at all.
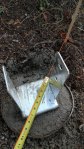
Bolts held in place by epoxy. Center bolt is for the post bracket. The other 3 bolts are to provide anchoring points into the concrete.
Need to mix concrete? Got a kiddie pool?
Bracket in place for final positioning. Hole filled 2/3 with concrete, threaded bolt to increase anchoring for bracket. After final positioning, form placed in hole and filled up with concrete.
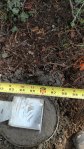
Finished bracket Measuring for the placement of the next hole.
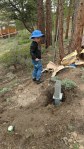
Measuring.
Measure many times, dig a hole once.
Using the Pythagorean Theorem to confirm hole placement.