Laundry Room: Paint, Cabinets, and Countertops

Next stage of the laundry room remodel is paint and cabinets! Paint is always a challenge. The laundry room original color scheme was mauve and tan, which simply had to go. We decided on a color scheme that had grey undertones, so that at least narrowed down our options from thousands to hundreds.

We settled on Balboa Mist (Benjamin Moore #1549) . A grey with blue/lavender undertones. Light in color because the laundry room is on the north side of the house and does not get a lot of natural light. In hindsight, we could have selected something with a little more color in it, but it works for now and we shall see if we are still liking it the next time our preferred paint comes on sale.

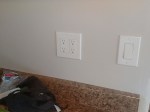
Preparation: Removed the single shelf from the wall and patched holes and the drywall bulge. Use fibrous tape when patching. Much better results and the homeowners that follow you won’t curse your repair nearly as vehemently.

Paint: Benjamin Moore Regal Select Matte Balboa Mist #1549. We have had a great experience with Benjamin Moore Regal Select paint. It is a thicker paint and provides excellent coverage. Durable as well.

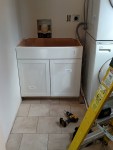
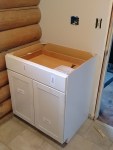
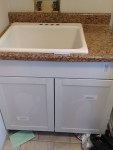
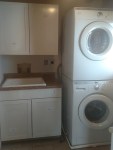
Cabinets: All were Arcadia Diamond NOW cabinets available at Lowe’s. One sink cabinet, one 30″ wide base, one 30″W X 18″H wall, and one 36″W X 30″H (wanted 18″H, but that was ‘unavailable’ even to order).

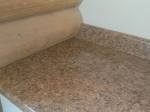
Counter top: Laminate counter top purchased from Lowe’s. Since the picture is rather small on the website and doesn’t really get bigger with zooming, we took a it of a chance. Besides, it was sold in a 6 foot length and we needed just under 6 feet. Turned out fine. Nice combination of browns and golds.

Critical Tools: Laser level, Dewalt drill/driver, jigsaw, planer, palm sander, pipe cutter, oscillating tool

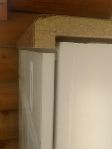
Skill Level: Cabinets – intermediate; counter tops – expert. The counter tops would have been intermediate except for the log wall. That required a specialty cut utilizing a jig saw, planer, and palm sander. Fine details but the difference between wondering if the job was done by a professional or knowing it was done by the local yokel after a few beers. Check out this YouTube video for cutting laminate counter tops.

Tip(s): Buy a good laser level. It makes setting the cabinets so much easier.

Shark bites (or whatever brand you prefer). Spend the money. Hate plumbing work slightly less.

Spend the 40 or so dollars and buy the classic and affinity color fans (or the color fans for whatever line of paint you choose). We used to grab one or two of the color sample strips, take them home, decide we really didn’t like any of the colors, and go back to the store for more options. Having the color fans was SO. MUCH. EASIER.

When you show up at the paint store at 7 am, they assume you are a contractor and have an account.

Easiest way to keep an active toddler from helping? One parent takes the kiddo 2000 or so miles away to visit grandparents. This equates to almost a week of uninterrupted work.

Gallery

Laundry Room: Flooring

And so the first overhaul begins! The laundry room is a 8′ 2.5″ deep and 5′ 7.5″ wide. The washer and dryer sit side by side (but are stackable) and there are two free standing cabinets in the room which provide limited storage. The floor has vinyl peel and and stick tile that is popping up in areas; what lies beneath remains to be seen.

What do we want to do to this room? First we want to increase storage space (a problem through out the house) by adding base and wall cabinets. We will stack the washer and dryer, which provides the space for a utility sink. A wall mounted drying rack and shelving will also increase the functionality of the room. From a cosmetic stand point, the floor will be replaced with porcelain tile and the walls will get new paint. The light fixture must also go, but it is challenging selecting a style to go with the log cabin. Check out the link laundryroom for the floor plan, just trade the utility sink and washer/dryer positions (Jess loves graph paper, Dave is not fond of her graph paper creations).

To make this all work, we must start at the base. The floors are first! The peel and stick tiles were pulling up from the old linoleum underneath due to water infiltration. This was never cleaned up properly so there was an interesting combination of hair, lint, and biological growth between the peel and stick tile and the linoleum. The smell was wonderful. The linoleum was then scraped away to reveal particle board! A highly useless material that turns to mush when wet, making it a fantastically superb choice for sub-floor material in baths and laundry rooms.

3/8″ plywood was laid down over the particle board to provide a fresh surface to adhere tile to without having to scrape up 20 year old linoleum paper backing. Ditra, a tile underlayment, was adhered to the plywood with latex portland cement (a type of thinset). The plywood was wetted down with a sponge prior to the application of thinset. The Ditra was left to bond with the plywood overnight and 12″ x 12″ porcelain tiles were set the next day with MAPEI porcelain tile mortar. The mortar was mixed thin and in small batches because the low humidity resulted in a fast drying; the tiles were set in an offset pattern with 1/8″ spacers. The mortar was allowed to harden overnight, and the next morning, the tiles were grouted. Viola! New floor in approximately 48 hours (okay, the area was only about 45 square ft, but it’s new flooring).

Tile: Floridatile coastal sand (purchased at Loveland Design Carpet One Floor and Home)

Why use Ditra? This product has been on the market for some time and in general is raved about. It prevents cracks in tile floors and serves as a water proof membrane.

Why not use cement board instead of plywood? Cement board is fine product for shower walls. It is heavy though and is a challenge to work with. It imparts stiffness which was not needed in this instance, so 3/8″ plywood was an excellent choice for providing a fresh surface to bond to.

Critical tools: Tile saw, notched trowels, mixer attachment for drill

Skill level: High intermediate – Easy peasy if you have laid tile before and have all the tools and knee pads. Dry fit your tiles first. Having the first row of tiles placed properly is critical for the success of this project.

Note: The tiles were not centered on the room. Why not? There will be appliances and cabinets along the edges of the room, so having a full tile on one side and a partial on another (non-symmetrical) will be difficult to notice. For a room that would have been more open, we would have centered the tiles for symmetry.