Master Bath: Demolition

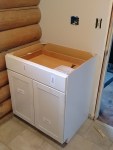
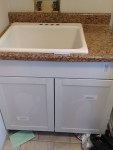
With the major work in the laundry room completed and those nagging fine details left, we have begun to focus our efforts on the master bath. So what are we doing to this move in ready bathroom? New flooring, paint, single vanity is being replaced with a double. This means the existing linen closet is going to be replaced with a smaller one. Smart moves for a house that is already short on storage. We hope to recoup some of our lost linen closet storage space with some overhead cubbies.

What the master bath looked like before we decided to overhaul it.

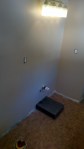
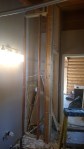
First step of the process – demolition! First sub-step of demolition – remove the toilet and vanity. The vanity was not installed correctly, so removing it was a simple as dragging it out of the bathroom (once the plumbing connections were disconnected). The vanity will be given a new top a re-used in the hall bath. Until that day, it shall live in the garage. Next sub-step of demolition was the removal of the shelves from the linen closet followed by the drywall. Stripping off the drywall was the moment of truth – and we were lucky. No nasty surprised like a pipe in the wall we wanted to remove. The project can proceed unhindered! The framing was removed and was in such good shape it could be reused.

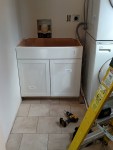
The floor tiles, vinyl, but not peel and stick, were well adhered to subfloor with mastic. With the exception of a few tiles in the closet that were pulling up, the tiles were not removed. 3/8″ plywood was screwed down on top of the tile to provide a clean surface for the thin-set to adhere to. Check out our first laundry room post for flooring details.

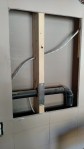
Final part of the demo process was creating the cut-outs for the recessed medicine cabinets. Our first surprise arrived in the form of a vent pipe where the cabinet was supposed to be recessed. Since the cabinets are recess or surface mount, plans were changed and the medicine cabinets will now be mounted on the wall surface.

Preparation: Remove light fixtures, toilet, vanity

Critical Tools: Sawzall, hammer, scraper, wrenches, strong back, beer

Skill Level: Easy

Tip(s): Have more trash bags than you think you are going to need. When in doubt, buy the big box of heavy duty contractor bags. Drywall weighs a lot.

Don’t use your tools of destruction recklessly. Recover and reuse what you can.

Drain the water from the toilet. Wear rubber gloves and have an old towel that you can throw away. You need that towel to stuff in the sewer pipe (the hole in the floor).

Turn off your water valves.

Gallery

Laundry Room: Paint, Cabinets, and Countertops

Next stage of the laundry room remodel is paint and cabinets! Paint is always a challenge. The laundry room original color scheme was mauve and tan, which simply had to go. We decided on a color scheme that had grey undertones, so that at least narrowed down our options from thousands to hundreds.

We settled on Balboa Mist (Benjamin Moore #1549) . A grey with blue/lavender undertones. Light in color because the laundry room is on the north side of the house and does not get a lot of natural light. In hindsight, we could have selected something with a little more color in it, but it works for now and we shall see if we are still liking it the next time our preferred paint comes on sale.

Preparation: Removed the single shelf from the wall and patched holes and the drywall bulge. Use fibrous tape when patching. Much better results and the homeowners that follow you won’t curse your repair nearly as vehemently.

Paint: Benjamin Moore Regal Select Matte Balboa Mist #1549. We have had a great experience with Benjamin Moore Regal Select paint. It is a thicker paint and provides excellent coverage. Durable as well.

Cabinets: All were Arcadia Diamond NOW cabinets available at Lowe’s. One sink cabinet, one 30″ wide base, one 30″W X 18″H wall, and one 36″W X 30″H (wanted 18″H, but that was ‘unavailable’ even to order).

Counter top: Laminate counter top purchased from Lowe’s. Since the picture is rather small on the website and doesn’t really get bigger with zooming, we took a it of a chance. Besides, it was sold in a 6 foot length and we needed just under 6 feet. Turned out fine. Nice combination of browns and golds.

Critical Tools: Laser level, Dewalt drill/driver, jigsaw, planer, palm sander, pipe cutter, oscillating tool

Skill Level: Cabinets – intermediate; counter tops – expert. The counter tops would have been intermediate except for the log wall. That required a specialty cut utilizing a jig saw, planer, and palm sander. Fine details but the difference between wondering if the job was done by a professional or knowing it was done by the local yokel after a few beers. Check out this YouTube video for cutting laminate counter tops.

Tip(s): Buy a good laser level. It makes setting the cabinets so much easier.

Shark bites (or whatever brand you prefer). Spend the money. Hate plumbing work slightly less.

Spend the 40 or so dollars and buy the classic and affinity color fans (or the color fans for whatever line of paint you choose). We used to grab one or two of the color sample strips, take them home, decide we really didn’t like any of the colors, and go back to the store for more options. Having the color fans was SO. MUCH. EASIER.

When you show up at the paint store at 7 am, they assume you are a contractor and have an account.

Easiest way to keep an active toddler from helping? One parent takes the kiddo 2000 or so miles away to visit grandparents. This equates to almost a week of uninterrupted work.

Gallery

Laundry Room: Flooring

And so the first overhaul begins! The laundry room is a 8′ 2.5″ deep and 5′ 7.5″ wide. The washer and dryer sit side by side (but are stackable) and there are two free standing cabinets in the room which provide limited storage. The floor has vinyl peel and and stick tile that is popping up in areas; what lies beneath remains to be seen.

What do we want to do to this room? First we want to increase storage space (a problem through out the house) by adding base and wall cabinets. We will stack the washer and dryer, which provides the space for a utility sink. A wall mounted drying rack and shelving will also increase the functionality of the room. From a cosmetic stand point, the floor will be replaced with porcelain tile and the walls will get new paint. The light fixture must also go, but it is challenging selecting a style to go with the log cabin. Check out the link laundryroom for the floor plan, just trade the utility sink and washer/dryer positions (Jess loves graph paper, Dave is not fond of her graph paper creations).

To make this all work, we must start at the base. The floors are first! The peel and stick tiles were pulling up from the old linoleum underneath due to water infiltration. This was never cleaned up properly so there was an interesting combination of hair, lint, and biological growth between the peel and stick tile and the linoleum. The smell was wonderful. The linoleum was then scraped away to reveal particle board! A highly useless material that turns to mush when wet, making it a fantastically superb choice for sub-floor material in baths and laundry rooms.

3/8″ plywood was laid down over the particle board to provide a fresh surface to adhere tile to without having to scrape up 20 year old linoleum paper backing. Ditra, a tile underlayment, was adhered to the plywood with latex portland cement (a type of thinset). The plywood was wetted down with a sponge prior to the application of thinset. The Ditra was left to bond with the plywood overnight and 12″ x 12″ porcelain tiles were set the next day with MAPEI porcelain tile mortar. The mortar was mixed thin and in small batches because the low humidity resulted in a fast drying; the tiles were set in an offset pattern with 1/8″ spacers. The mortar was allowed to harden overnight, and the next morning, the tiles were grouted. Viola! New floor in approximately 48 hours (okay, the area was only about 45 square ft, but it’s new flooring).

Tile: Floridatile coastal sand (purchased at Loveland Design Carpet One Floor and Home)

Why use Ditra? This product has been on the market for some time and in general is raved about. It prevents cracks in tile floors and serves as a water proof membrane.

Why not use cement board instead of plywood? Cement board is fine product for shower walls. It is heavy though and is a challenge to work with. It imparts stiffness which was not needed in this instance, so 3/8″ plywood was an excellent choice for providing a fresh surface to bond to.

Critical tools: Tile saw, notched trowels, mixer attachment for drill

Skill level: High intermediate – Easy peasy if you have laid tile before and have all the tools and knee pads. Dry fit your tiles first. Having the first row of tiles placed properly is critical for the success of this project.

Note: The tiles were not centered on the room. Why not? There will be appliances and cabinets along the edges of the room, so having a full tile on one side and a partial on another (non-symmetrical) will be difficult to notice. For a room that would have been more open, we would have centered the tiles for symmetry.

The Money Pit

Almost a year to the day after closing on the sale of our (former) house in Delaware, we closed on the purchase of our new house in Nederland, CO. Nederland, or Ned, is a quirky mountain town west of Boulder. We fell in love with the old-fashioned community spirit and ease of access for outdoor activities.

house_04
Our new abode
house_03
View from the deck.

Our new house is within walking distance to the elementary school and town. On a south facing slope, we get fantastic sun that warms the house up quite nicely

This putting down roots seems a bit counter intuitive to our travel. We have a home base now, and while the house is move in ready, there are some changes we are going to make to improve the living space for our family.

So what does that mean? Poor Abby’s make over has been put on the back burner for a bit. She at least has her new brakes to go up and down the mountain, but her interior is slightly deconstructed as the re-upholstery projects are now in a holding pattern. Another reason for the delay is the neighborhood HOA of our rental in Loveland. Simply put, they are extremely strict and one of our neighbors has the association on speed dial. We can’t risk yet another violation because Abby was parked in the driveway 5 minutes to long.

What about the beer? We are spending weekends up at the Nederland house, and don’t have a brew space up there yet. A brew shed has been promised for sometime in the future . . . but the future is not near at this time. So no brewing blogs either.

However, we will be blogging about home renovations! You can follow along as we tear apart a perfectly serviceable house to improve areas like the laundry room and master bath. If things go well, we hope to undertake a ‘big dig’ next year.

The laundry room - first room to be renovated!
The laundry room – first room to be renovated!

Best thing about following someone else’s renovation – you don’t have to live with the dirt, dust, and general chaos.

2016 in Review

No better way to start the new year than to reminisce about 2016 and plan a trip (or two) for 2017.

Some quick stats for 2016

  • Miles traveled in Abby: ~ 13,800
  • Time spent in Abby: ~12 weeks
  • Longest stretch of time in Abby: ~ 4 weeks
  • National Parks/Monuments visited: 18
  • State Parks visited: 13
  • BLM lands camped on: 8
  • Private campground: 6
  • Family members/friends imposed on: 6
  • Canadian Provinces visited: 2
  • States visited: 22
  • Home brews: 12
  • Home brews dumped: 1
  • New pieces of brewing equipment purchased: 2

Looking back 2016 was a chaotic year. We didn’t travel in California as much as we had hoped when we were living there. Our move to Colorado involved two too many visits to emergency rooms. We didn’t spend as much time in any one of many amazing locations as we would have liked. But we had a lot of fun and saw some truly amazing sights. We’ve watched Alex grow and develop an enjoyment of the outdoors.

Our 2017 RV travel schedule is complicated by the fact that Jess is now employed. The copious free time of unemployment has vanished. We also need to consider visits with family so Alex can continue to develop a close relationship with his Mimi and Papa and uncles and aunts and cousins. We also hope to change our trips slightly. Instead of the wheels are always rollin’ mentality where we average 250 miles of driving per day of a trip, we want to focus on a deeper exploration of an area.

This means we will have to stop using a shoe horn to add destinations into our itinerary that are *only* 150 miles away. We will have to leave some amazing destinations off our list, for a future trip (or when we win the lottery).

And to add to the list, we found a house that we liked and are in the final stages of the purchasing process. Remodeling fun also awaits us in 2017 (and 2018 and 2019).

2016 Gallery

Loveland Breweries: Crow Hop

We had a rare night out when Mimi and Grandpa came to town to visit. Which meant date night! Due to procrastination and a slow recovery from a particularly vicious stomach flu (which shall be referred to as the unspeakable), we didn’t make our reservation until the day of our night out. The result was an 8:30 reservation at the 4th Street Chophouse (fantastic food and dining experience, go, see if Stacy has a table in her section, you will not be disappointed).

So what did we decide to do to kill time? Visit Crow Hop Brewery and Taproom, a very wise idea after not drinking for a week due to the unspeakable. A cozy tap room with serve yourself pretzels and water. There were board games aplenty (Rock ’em, Sock ’em Robots anyone?), which took patrons back to their childhoods in the 80s and 90s.

Flagship Beersimg_20161210_185757

  1. Loose tongue lager – aroma was of cat urine (p-menthane-8-thiol-3-one; can be the result of oxidation of beer during storage) and cooked cabbage (DMS; result of poor conversion of SMM precursor in malt to DMS – longer boil with more vigor!).
  2. Progression Pale Ale – hint of cotton candy/fruit in aroma, with a slightly metallic taste. Typical of a historic pale ale. Drinkable.
  3. Afternooner IPA – a citrus lemon drop aroma, slightly medicinal. This was not a hop bomb. Some citrus on palate, with a hint of sweetness. Mild bitterness. Pleasant and drinkable.
  4. Rado’s Red Ale – Sweet, not much hop aroma, very mild bitterness. Unoffensive.
  5. Big Water Nut Brown – What we called the most Canadian beer of the bunch – very polite, trying not to offend. Similar to the red ale, but less sweet. More toasted flavor.
  6. Sleeping Owl Stout – Coffee, coffee, and more coffee. Strong coffee aroma that translates into flavor. Roasted bitterness. A bit disappointing.
  7. Window Screen Wheat – Slight aroma of DMS and hops. Citrus on palate, did not pick up an clove-like phenolic character.

Rotating Beers

The rotating beers on tap were Orange Crush Kettle SourStinger New England IPAStandard 2016 edStandard 2015 ed*, and Barrel Aged 2015 ed*.

Favorites

Orange Crush Kettle Sour – a fantastic beer. Orange flavor was present without being overpowering. Right amount of tartness – truly like the Orange Crush you would find in Dewey Beach, DE. This is the beer we would look for on our next visit.

Afternooner IPA – a pleasant surprise, especially with the slightly medicinal aroma. No Orange Crush Kettle Sour on tap? Go for this beer.

Not drinking these

Sleeping Owl Stout – just too much coffee aroma and flavor. Near impossible to identify any other aromas or flavors.

Loose Tongue Lager – maybe this keg was just a bad example of this particular beer, but wouldn’t order this again without trying it out first.


Tasting Notes: Brown Ale, Version 1

We brewed our Brown Ale November 20, hoping to add another well done beer to our taps. During fermentation we were concerned due to the thin mouth feel and non-existent hop character. Brown ales are not traditionally big, hoppy beers, but we were not happy with what we were tasting.

We decided to dry hop with 1 oz Northern Brewer hop pellets (7.6% alpha acids) upon transfer to the conical fermentation vessel, 72 hours prior to cold crash.

Our Brown Ale, Version 1.

We were very pleasantly surprised with this beer. This is not a big beer; it has hints of malt and hops on the aroma. The flavor was malty. The color has a hint of red and the clarity is good. Head an foam lacing are fantastic. It is also nice to have beer on tap at approximately 5% ABV (rather than 8 – 9%).

We are will look to make some changes to the recipe. Initial thoughts include increasing the flaked oats to 1 lb and the Caramunich III 60L to 1.5 – 2.0 lbs. The Crystal 75L will be decreased and perhaps changed to a different malt. Although, it will be a pleasure to drink this brown ale in its current incarnation.


December 4, 2016: White Stout, version 2

With our brown ale cruising along, and the temperatures looking to be warmer, we decided to brew, in all likelihood for the last time in 2016. This time, we are revisiting the disaster that was our white stout.

Grain bill:

  • 15 lbs Maris Otter
  • 0.5 lbs Crystal 40L
  • 1 lbs flaked oats
  • 1 lbs flaked barley

Hops (Pellet) and other boil additions:

  • 1 oz Magnum 14.2% alpha acids (60 minutes)
  • 1 oz Crystal 4.8% alpha acids (5 minutes)
  • 3 oz cocoa powder (5 minutes)
  • 1 table Whirlfloc (5 minutes)

Additions at packaging:

  • Lactose (amount to be determined)
  • Coffee (much less than our last attempt)
  • Chocolate tincture?

Yeast:

  • Wyeast 1272 American Ale II (#1058314, 11/09/2016 mfg)

    fermentation_ws2
    We cannot sing the praises of Wyeast 1272 enough.

Stats:

  • Starting gravity: 1.079
  • Brew house efficiency: 75%
  • Final gravity: 1.009
  • Approximate % ABV: 8.9
  • Approximate IBUs: 56.4 (Rager)/46.2 (Tinseth) as determined using the Brewer’s Friend Recipe Calculator.

Procedure Highlights: Our first brew with our new 20 gallon mash tun from SS Brewing Technologies! We cleaned manufacturing oils off according to instructions received with the mash tun (take apart that butterfly valve – it is well worth it). Things were going smoothly, until we realized, after we added our striker water, we were forgot to put the false bottom in. DOH! False bottom in place, we proceeded with our mash in.

Alex checking out the new mash tun.

A cooler day, we lost more heat from the strike water than anticipated on mashing in (part due to temperatures, part due to rectifying our false bottom oversight). We pre-heated our mash tun (as recommended by the manufacturer). Our strike water temperature was 77 degrees Celsius, our target mash in temperature of 69 degrees Celsius. Our actual mash in temperature was 65 degrees Celsius, 4 degrees shy of our target. We brought the mash temperature up by adding more strike water.

The wort was oxygenated for 40 seconds prior to pitching the yeast slurry. The yeast starter culture was cold crashed after approximately 14 hours of growth in 10% DME (w/v) media. The cold crash was to arrest metabolism and settle the yeast so excess liquid could be decanted.

After a eight days in the primary fermentation vessel (Spiedel), the beer was transferred to a metal conical bottom fermentation vessel and kept at approximately 19 degrees Celsius (ambient temperature) for 72 hours. At the time of transfer, the beer was dry hopped with 1 oz of Great Northern Brewer hops (7.6% alpha-acids) in an attempt to increase the aroma profile. The beer was sampled after 72 hours and no acetaldehyde character was detected; there was an improvement in aroma and flavor after the dry hopping. Mouth feel is still thin. Lactose will be added at packaging to determine if this issue can be corrected. The fermentation vessel was then transferred to -2 degrees Celsius freezer for the cold crash.

Comments:

  • Sweet wort boil volume was high due to an excessive amount of sparge water used.
  • Our efficiency was similar to our last two amber ale brews (brew 1 and brew 2).
  • The wort is darker than anticipated; premature panic set in. Beer turned out to be lighter than feared. Grain bill will be left alone.
  • If it hasn’t be obvious with our last few posts, WYeast #1272, American Ale II is becoming our go to work horse.
  • Lower mash in temperature resulted in over attenuation during fermentation. Sampled beer during gravity checks, thin mouth feel and poor hop character. Next time we brew this beer we need to ensure our actual mash in temperature matches our target.

November 20, 2016: Brown Ale v. 1

With a rather delicious Bourbon Vanilla Imperial Porter and fine Alex’s Amber Ale on tap, we decided to brew a new beer. Survey said – Brown Ale!

Grain bill:

  • 8 lbs 2-row domestic
  • 2 lbs Crystal 75 L
  • 1 lbs Caramunich III 60 L
  • 0.5 lbs chocolate malt
  • 0.5 lbs flaked oats

Hops (Pellet):

  • 0.625 11.1% alpha acids (60 minutes)
  • 1.25 oz Crystal 4.8% alpha acids (5 minutes)

Yeast:

  • Wyeast 1272 American Ale II (#1455294, 10/20/2016 mfg )

    Another beautiful fermentation profile from WYEAST 1272.
    Another beautiful fermentation profile from WYEAST 1272.

Stats:

  • Starting gravity: 1.044
  • Brew house efficiency: 75%
  • Final gravity: 1.005
  • Approximate % ABV: 5
  • Approximate IBUs: 22.9 (Rager)/23.0 (Tinseth) as determined using the Brewer’s Friend Recipe Calculator.

Procedure Highlights: A cooler day, we lost more heat from the strike water than anticipated on mashing in. Our strike water was heated to 76 degrees Celsius, 7 degrees our target mash in temperature of 69 degrees Celsius. Our actual mash in temperature was 67 degrees Celsius, 2 degrees shy of our target.

The wort was oxygenated for 40 seconds prior to pitching the yeast slurry. The yeast starter culture was cold crashed after approximately 14 hours of growth in 10% DME (w/v) media. The cold crash was to arrest metabolism and settle the yeast so excess liquid could be decanted.

After a eight days in the primary fermentation vessel (Spiedel), the beer was transferred to a metal conical bottom fermentation vessel and kept at approximately 19 degrees Celsius (ambient temperature) for 72 hours. At the time of transfer, the beer was dry hopped with 1 oz of Great Northern Brewer hops (7.6% alpha-acids) in an attempt to increase the aroma profile. The beer was sampled after 72 hours and no acetaldehyde character was detected; there was an improvement in aroma and flavor after the dry hopping. Mouth feel is still thin. Lactose will be added at packaging to determine if this issue can be corrected. The fermentation vessel was then transferred to -2 degrees Celsius freezer for the cold crash.

Comments:

  • Sweet wort boil volume was high due to an excessive amount of sparge water used.
  • Our efficiency was similar to our last two amber ale brews (brew 1 and brew 2).
  • The wort is darker than anticipated; premature panic set in. Beer turned out to be lighter than feared. Grain bill will be left alone.
  • If it hasn’t be obvious with our last few posts, WYeast #1272, American Ale II is becoming our go to work horse.
  • Lower mash in temperature resulted in over attenuation during fermentation. Sampled beer during gravity checks, thin mouth feel and poor hop character. Next time we brew this beer we need to ensure our actual mash in temperature matches our target.

Rotors and Brake Pads

Symptoms: Grinding noise while braking, brake pedal feeling like one was stepping on a wheel of baked brie.

One of Abby's rear rotors. That crack is a good sign the brakes needed replacing.
One of Abby’s rear rotors. That crack is a good sign the brakes needed replacing.

Problem: Abby still had her original brakes and rotors. These poor pads and rotors had 86,000 or so miles on them. Several thousand of those miles had some extra abuse because we were hauling our cargo trailer. Which didn’t have brakes so Abby was responsible for stopping not only her weight, but the weight of the cargo trailer.

Solution: Have Dave replace the brakes! We were fully expecting this replacement, so we are considering this to be a maintenance activity.

When Dave got one of the rear rotors off (pictured) there was a significant crack formed and others starting to develop. All the brake pads were worn, not far from the point of the wear sensor.

Dave purchased the rotors and brake pads from Advance Auto Parts.

Degree of Difficulty:

Moderate. Front and rear brake replacement should each take approximately 3 hours. Bravery and a good jack is required because it is such a large vehicle. Caveats to the degree of difficulty are

  1. Dave has replaced the brakes and rotors on smaller vehicles.
  2. No unexpected challenges arise during the replacement.

Parts/Tools Required:

  • Rotors
  • Brake pads
  • Breaker bar
  • Wrenches
  • Jack
  • Flattened cardboard box (cushions the gravel of the storage lot)
  • Knee pads (like floor tilers wear)
  • An extensive repertoire of curse words (Sailors should be jealous)

Repair Tips/Comments:

  • Unlike a typical Mercedes sprinter chassis, the rear brake pads and calipers are the same as the front brake pads. Winnebago wanted to make sure there was stopping power, because there is a large amount of momentum in a RV lumbering down the road.  One only discovers the ‘oh, haha, you thought you had regular rear brakes’ switcheroo after the RV is up on a jack, completely apart, and nothing fits.
  • The rear (front!) brake rotors are a snug fit and require some persuasion when being put back on (tapping with a hammer). The hub assembly is hollow and releases a very fine rust dust that can settle into the threads of the rotor bolt holes. Blow out the bolt holes with compressed air BEFORE putting the bolts in.
  • If you didn’t blow out the bolt holes with compressed air and the bolt threads freeze up, brute force is required to remove the bolts. The bolt holes will need to be re-tapped, and you’ll need to stop at 4 different hardware stores to see if anyone carries a Grade 8 14mm bolt with a 1.5 thread pitch (start at Ace, and you might have to stop at only one hardware store).  Mind you, it’s 3:30pm and snow is forecast for the next day.
  • Stop at one Advanced Auto Parts store only to be told the part is in stock at another location? Purchase said part at first location and drive to the second to pick it up, only to be told they are out of stock? They have a special area where they set aside parts to picked up. “Oh, sorry man.  We found your brakes.”